Sudden shutdowns are among the most disruptive problems a PC, laptop, or mobile device can experience. If your system powers off without warning—especially during heavy tasks like gaming, video editing, or multitasking—the underlying issue could be an overheating chipset. Chipsets, particularly those managing communication between your CPU, RAM, and storage, play a vital role in system stability. When they overheat, the device can crash, throttle performance, or shut down abruptly to prevent damage.
What Is a Chipset and Why Does It Overheat?
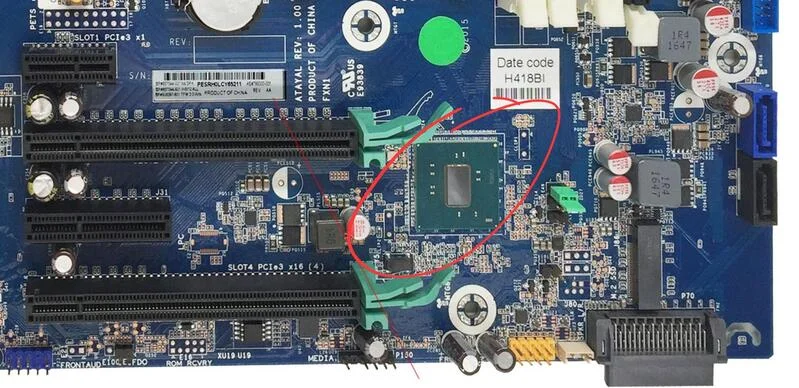
A chipset is a collection of microchips on the motherboard that acts as a central hub for communication between the CPU, memory, graphics card, and storage. There are typically two major components:
- Northbridge: Handles high-speed components like the CPU, RAM, and GPU (in older systems).
- Southbridge: Manages I/O devices, storage, and peripherals.
In modern systems, much of this functionality is integrated into the CPU or a system-on-chip (SoC), but heat generation from the remaining components is still significant—especially during intensive operations.
Common reasons for chipset overheating:
| Cause | Description |
|---|---|
| Inadequate cooling | No dedicated heatsink or insufficient airflow |
| Dust accumulation | Blocks airflow and traps heat around components |
| Overclocking or voltage tweaks | Increases power draw and heat output |
| Poor thermal paste or pad application | Dry or improperly applied thermal interface material leads to heat buildup |
| Ambient temperature | High room temperatures reduce cooling efficiency |
| Aging hardware | Older chipsets may degrade and become more thermally sensitive over time |
How to Identify Chipset Overheating
Before applying fixes, confirm that overheating is the actual problem.
Symptoms of Overheating Chipset:
- Sudden shutdowns under load
- System restarts during intensive tasks
- Thermal throttling (slow performance before shutdown)
- Hot air coming from vents or a burning smell
- Motherboard chipset temperature exceeding 80–90°C (176–194°F)
Tools to Monitor Temperatures:
| Tool | Platform | Function |
|---|---|---|
| HWMonitor | Windows | Monitors CPU, GPU, and motherboard sensors |
| SpeedFan | Windows | Tracks temperatures and controls fan speeds |
| HWiNFO | Windows | Detailed sensor readings for all components |
| iStat Menus | macOS | Monitors temperatures, fans, and sensors |
| Core Temp | Windows | Focuses on CPU but may show chipset temps |
Look for sensors labeled “PCH” (Platform Controller Hub), “System,” or “Motherboard.”
Step-by-Step Fixes for Overheating Chipsets
1. Clean Dust from Fans, Vents, and Heatsinks
Dust is the most common and easily fixable cause of overheating.
How to Clean:
- Power off the device and unplug it.
- Open the case or panel (desktop/laptop).
- Use compressed air to blow out dust from:
- Chipset heatsinks
- CPU and GPU fans
- Exhaust vents
- Power supply unit
Tip: Hold fans in place while cleaning to avoid spinning them too fast.
2. Improve Airflow and Case Ventilation
Airflow is essential for maintaining stable temperatures across all components.
| Improvement | Impact |
|---|---|
| Add intake/exhaust fans | Promotes cooler air circulation |
| Organize cables | Reduces airflow obstruction |
| Use dust filters | Keeps future dust from building up again |
| Avoid enclosed desks | Traps heat around the case |
Ensure the chipset area (usually near the bottom right of a motherboard) gets adequate airflow from nearby fans.
3. Reapply Thermal Paste or Replace Thermal Pads
Thermal paste or pads transfer heat from the chipset to its heatsink. Over time, they dry out or degrade.
Steps:
- Power down and remove the heatsink carefully.
- Clean old paste or thermal pad residue with isopropyl alcohol.
- Apply a small amount of fresh thermal paste or replace the thermal pad with one of equal thickness.
- Reattach the heatsink evenly and firmly.
Warning: Be gentle—chipsets aren’t as resilient as CPUs.
4. Install Aftermarket Chipset Heatsinks or Fans
Some motherboards come with passive cooling or no cooling at all for the chipset. In that case, installing a dedicated heatsink or fan can help significantly.
| Cooling Upgrade | Effectiveness |
|---|---|
| Passive aluminum heatsinks | Good for moderate loads |
| Active chipset fans | Best for gaming or high-performance tasks |
| Motherboard with heatpipes | Spreads heat across multiple zones |
These upgrades are particularly useful for gaming PCs and older systems with limited thermal design.
5. Adjust BIOS Settings
If you’ve been tweaking voltage or clock speeds, revert to default settings.
Steps:
- Enter BIOS/UEFI during boot (usually Del or F2).
- Reset settings to default or “Optimized Defaults.”
- Look for chipset-related settings and disable overvoltage or overclocking features.
Bonus Tip: Some BIOS setups let you manually set fan curves or temperature thresholds.
6. Avoid Overclocking (or Undervolt If Possible)
Overclocking increases performance—but also thermal output. If your system is unstable due to overheating, revert to factory settings or try undervolting (reducing voltage while maintaining performance).
Use tools like:
- Intel XTU (Extreme Tuning Utility)
- AMD Ryzen Master
Both allow you to adjust voltages and monitor thermal responses in real-time.
7. Keep Software and Drivers Updated
Chipset drivers from Intel, AMD, or your motherboard manufacturer may include thermal or power optimizations.
Steps:
- Visit your motherboard manufacturer’s website.
- Download the latest chipset and power management drivers.
- Update firmware if a BIOS update is available (be cautious during the update process).
Summary Table: Fixes for Overheating Chipsets
| Fix | Best For | Difficulty |
|---|---|---|
| Cleaning dust | All systems | Easy |
| Improving airflow | Desktop users | Moderate |
| Reapplying thermal paste/pads | Systems older than 1–2 years | Moderate |
| Installing chipset heatsinks/fans | Gaming PCs, no stock cooling | Moderate |
| BIOS tweaks and resets | Recently tweaked systems or overclocked builds | Easy |
| Driver and firmware updates | All systems | Easy |
When to Replace Hardware
If none of the above works, your chipset may have sustained thermal damage or the board may be aging out of its safe operational range.
Signs it’s time to replace:
- Crashes continue even under light loads
- BIOS doesn’t detect components reliably
- Chipset temps stay high despite cooling improvements
In this case, replacing the motherboard (or the entire system in the case of laptops) is often the only long-term solution.
Final Thoughts
Overheating chipsets are a serious but solvable problem. With proactive maintenance—cleaning, good airflow, and proper thermal materials—you can extend the life of your hardware and prevent sudden shutdowns. The key is to monitor temperatures regularly and act at the first signs of instability. Whether you’re a casual user or a performance enthusiast, understanding how to cool your system properly is essential for long-term reliability